HORNE HOME, Part 3  

Posted by cokelady

Wait!!! This dumb thing put my posts on backwards! It doesn't really matter, but if you're a perfectionist (Sister Tammi) you can scroll down to the first one, then work your way up.
Yes, here it is -- a whole post just for my bathroom! I LOVE MY BATHROOM! And let me say, THANK YOU, MANDIE for getting me hooked on blue and yellow all those years ago!!! You have influenced my life and I now have a bright, cheery bathroom -- all thanks to you!!!

I only wish I would've thought to take "before" pictures of this bathroom. It was SOOOOOOO GROSS. And now, WOW!!! Don'tcha love it?!

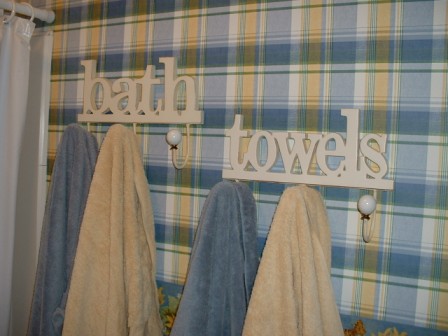
Great wall paper, hu?! And the towel hooks -- they're from Aunt Sue's store. Couldn't pass 'em up.


The towel racks are from Sue's store as well. Okay, so Aunt Sue and Mandie are equally responsible for my fantastic bathroom.


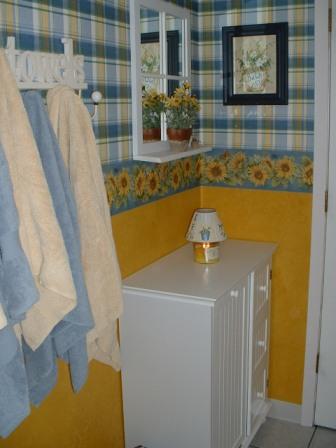
It's hard to tell in the pictures, but the yellow is that same split roller style of faux painting -- two different shades of yellow. I LOVE THIS ROOM! Did I mention that? It just makes me SO HAPPY. How could you walk into a bright, HAPPY room like this and not smile?! It's a great way to start or end a day, believe me! :-)

This entry was posted on 10:32 PM . You can leave a response and follow any responses to this entry through the Subscribe to: Post Comments (Atom) .

9 comments

I'm not a fan of blue, but that particular blue with the yellow is very pretty.

Anonymous  

wow, does anyone actually LIVE
in thoses rooms? did you airbrush
all thoses pictures?

Anonymous  

does this thing have spell check?

HIT THE BENCH! You're OUTTA the blog!!! Don't you know the rule??? NO ANONYMOUS COMMENTS ON THIS PAGE!

I can't seem to get the spell check to work. Always makes me pretty nervous to post something without it!

QUESTION...when you are doing a faux painting like that...how do to you match it up near the ceiling and trim? I would really like to do that in all the church bathrooms, but I don't want to mess anything up.

Practice, practice, practice! No, it's really not that hard. You can't match it PERFECTLY to the rest of the wall, but if you just use the one side of the roller (usually the darker color first) and go along the edge and then go back with your light color, it'll look pretty close. They sometimes provide a little wooley tool you can use to get in the corners and edges with, but I've found that a moist sponge works better for me. You just have to find what works best for you -- and be willing to settle for not quite perfect, since this style of painting is not uniform. Might be quite difficult for you! And when you choose your colors, it's best to pick two from the same color card -- a lighter and a darker color of the same shade. Just a thought!

Hey, if you and your Mom can get to the place where you can settle for "not quite perfect", I think that I can too. Stop laughing! It can hap-pen!

Let me make sure that I am understanding you correctly though. You would lay down the darker color and then go back and lay down the lighter color (with a roller, a brush, which?) and then use a damp sponge to blend them by dabbing at it? I know that I sound like a very slow student, but I am an audio/visual/kinetic learner, in that order, and you are trying to give me visual (written) instructions, so I'm out of order and have to get it straight in my head. I know...more trouble than I am worth at times, but hey, it takes all kinds to build character in us. ~hee hee~

Seriously though, I do appreciate your help and attempt to teach me, via blogworld, how to do this. I really do want to try it. Maybe I'll try it in the shower room first, so that if I really mess it up then no one else has to see it other than just us.

The glorious thing about this style of painting is that if it doesn't look right the first time you can just let it dry for a few minutes and try again.

Yes, you lay down the darker color first, then turn the roller over and go over the same with the lighter color, but very gently so you get the nice "meshed" look.

To get in the corners and edges, I get a damp sponge, dip it just a titch in both colors of paint (you just have to experiment until you find what works) and dab until it looks like it blends with the rest of the wall.

Once you get started, you'll FREAK OUT. "This is crazy!!! It can't possibly be right!" But if you just relax and keep working at it, you'll get it just the way you want it. Takes a little trial and error, but you find what you like pretty quick. I know it's hard to "learn" over the computer, but there's really nothing to "teach" you anyway -- you just have to give it a shot and work it out the way you like it!

Good luck!!! -- Send pictures when you're all done, okay?!

You got it! I'll send pictures, once my tight-fisted husband turns loose of a couple bucks so that I can buy the paint, the roller and the pan. hee hee!

I just finished my second "Mother's Day" card. They both turned out so cute! I hand stitched on each card and it turned out perfect. The stitches weren't completely straight but that is what made it so perfect.